Hello everybody, hope you are having an amazing day today. Today, I will show you a way to make a special dish, stronger bread starter by increasing the yeast content. One of my favorites food recipes. This time, I am going to make it a little bit tasty. This is gonna smell and look delicious.
Stronger Bread Starter By Increasing the Yeast Content is one of the most well liked of current trending foods in the world. It is appreciated by millions every day. It’s easy, it is quick, it tastes delicious. Stronger Bread Starter By Increasing the Yeast Content is something that I’ve loved my whole life. They’re nice and they look fantastic.
As the wild yeast grows stronger, the starter will become more frothy and sour-smelling. At this point, the starter should smell fresh, mildly sweet, and yeasty. By now, the starter should be looking very bubbly with large and small bubbles, and it will have doubled in volume.
To get started with this particular recipe, we must prepare a few components. You can cook stronger bread starter by increasing the yeast content using 10 ingredients and 26 steps. Here is how you cook it.
The ingredients needed to make Stronger Bread Starter By Increasing the Yeast Content:
- Prepare 110 grams Raisins (not coated with oil or wax)
- Make ready 210 grams Water (domestic natural spring water) or boiled and cooled water
- Get 40 grams Sugar
- Make ready 1 A plastic or glass jar without a lid
- Make ready 1 piece Paper towels and a rubber band or aluminium foil
- Make ready To extend a previously made starter
- Prepare 100 grams Raisins (not coated with oil or wax)
- Take 200 grams Water
- Make ready 40 grams Sugar
- Make ready 10 grams Raisin starter
I observed countless times that liquid starters suffer a lot when First, in order to increase yeast numbers, there has to be wild yeast to start with in the starter culture. Letting the yeasty smelling starter feed and reach peak volume is a good way to insure that the yeast are increasing and there is a healthy. Some start with rye or whole wheat flour, thinking there is more yeast potential on the surface of the whole grains, but I've always had success with all-purpose flour, which is ideal for starting white After a few days it should start to bubble and even look foamy, and smell clean and yeasty, even vinegary. A starter is a homemade fermented yeast for bread.
Steps to make Stronger Bread Starter By Increasing the Yeast Content:
- If the starter is exposed to air, it'll deplete the sugars and build up carbon dioxide. If it's not exposed to air, it'll start fermenting and produce alcohol.
- If you want to let the yeast grow, it needs air to grow, thus don't cover your starter with a lid! That's the logic behind the instructions.
- If you want to make a strong and active raisin starter, use a wide-mouth container so that comes into plenty of contact with air. Don't cover it with a lid, cover with paper towels or foil instead, and increase the number of times you mix it up. That alone makes all the difference.
- Don't wash the raisins. If you are using tap water, filter it or use boiled and cooled water. If you use straight tap water, the starter may become acidic, so use soft water like spring water.
- Don't wipe your starter container with a kitchen towel before use. If it has water droplets after washing it, it's fine. Sterilize the spoon mix the starter in boiling water.
- Wash all of your equipment well using detergent, but don't wipe with a kitchen towel as the towels may have bacteria on it.
- Here I made two batches of starter at once to demonstrate the theory, but just make the lidless version.
- How to make the starter: Put the sugar and water that has been warmed up to about 30°C in the container and dissolve the sugar. Add the raisins.
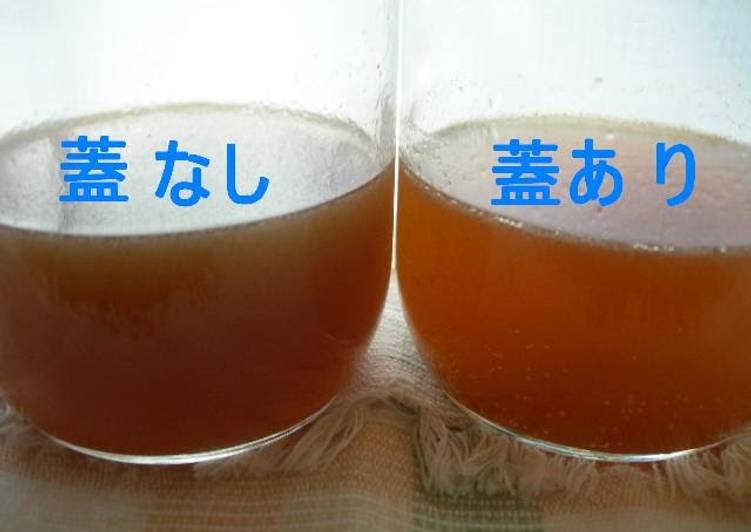
- Start the experiment! As you can see, the one on the left is covered with a lid. The one on the right has no lid. Both have the same amount of ingredients.
- If doing this at room temperature: Put the starter jars in a warm place, and mix them up twice a day. The ideal room temperature is 26 to 30°C.
- Day 2: The raisins are rising to the surface. You can see some fine bubbles in the lidded one. In the lidless one you can see big bubbles.
- Day 4: The lid-covered one has lots of bubles! The lidless one has about the same amount of bubbles. The liquid in the lidless one is a bit darker.
- Day 5: The raisins are floating above the surface of the lid-covered on, and the liquid is foaming. If you mix it up, the foam increases and the liquid gets more cloudy.
- The lidless one has a sweet-tart aroma and no detectable alcohol smell.
- If you mix it up and look at it from the side, it has some fine bubbles. Strain off the raisins from both versions, and store in the refrigerator.
- The left one is the lidless version, and the right one is the lidded version. The lidded version has a lighter, prettier color, and foams up like beer. The lidless version is cloudier and darker!! And when you mix it up, it stays quiet. It also tastes stronger, and has way more yeast!! Both are done.
- Store them both covered. While they are stored in the refrigerator, open them up at least twice a month to expose it to air. Use within a month.
- When there is only a little starter left, using the "extend" amounts to keep them going. You can keep them alive for years. Add 1 teaspoon of sugar once a month and store.
- How to make the starter extension: The temperature to aim for for the raisin starter is 25 to 30°C.
- Use your existing starter liquid as the mother. Put 30°C water in a clean container, add sugar and dissolve, then add the raisins and the mother starter. Cover with paper towels.
- Put the container in a warm location. Observe its progress, using the photos on this page as reference.
- You can use the raisins used to make starter mixed into dough to make bread.
- If you use raisins to make starter, you shouldn't get mold. Raisins contain a powerful anti-fungal agent called propionic acid.
- Raisin bread does not mold easily. If mold does occur, there are probably other reasons.
- If something called acetic acid bacteria develops, a white film will develop on the surface of the liquid, and it will smell bad.
- If that happens, just throw the starter out and try again If you introduce as much oxygen as possible, you can avoid this.
With regular yeast bread, you can use a store-bought packet of active dry yeast. Half of the starter is discarded to keep the yeast growth under control and manageable and the remaining starter healthy. A yeast starter is essentially a mini batch of beer. Making a yeast starter is one of the best homebrewing techniques for improving your beer. While not absolutely necessary, starters can really take your beer to the next level.
So that’s going to wrap it up with this exceptional food stronger bread starter by increasing the yeast content recipe. Thanks so much for reading. I am confident you will make this at home. There is gonna be more interesting food in home recipes coming up. Don’t forget to bookmark this page in your browser, and share it to your family, friends and colleague. Thanks again for reading. Go on get cooking!